What to Expect During a Tankless Water Heater Installation
A step-by-step walkthrough of the tankless water heater installation process — from the home assessment to final testing and cleanup.
Our specialists find that moving to an on-demand hot water system is a huge upgrade for most properties through professional tankless water heater installation.
The 2026 Department of Energy reports show these units cut energy use by up to 34%. You might be wondering what exactly happens on the day of the upgrade.
We break down every phase of the process below to provide complete transparency.
Knowing What to Expect During a Tankless Water Heater Installation helps you plan your day with confidence.
What to Expect During a Tankless Water Heater Installation: The Home Assessment
Every quality project begins with an in-home assessment scheduled a week before the main event. Our crew evaluates your current setup to determine exact specifications and code requirements. The National Fuel Gas Code, known as NFPA 54, requires an exact gas load capacity measurement.
This step prevents future misfires or pressure drops across your other gas appliances. We also identify the best mounting location and plan a safe venting route to the exterior. A standard unit requires a minimum 36-inch front clearance for future maintenance access.
Any reputable contractor who quotes a firm price without seeing your home first is cutting corners. Our goal is to arrive on installation day with all the correct materials and equipment. Following these initial checks ensures a smooth transition.
Assessment Checklist
- Gas Line Capacity: Verifying BTU requirements for the new model.
- Space Clearances: Ensuring 36 inches of front access.
- Venting Pathways: Mapping out a route that meets local US building codes.
- Electrical Supply: Checking for a standard 120V outlet nearby.
Preparing for Installation Day
Taking a few simple steps the afternoon before helps things go smoothly. Our technicians appreciate a clear path from the front door to the utility space. You should remove any stored items within a three-foot radius of the old equipment.
This simple action saves valuable time during the initial setup phase. We ask that you leave room in the driveway or garage for a commercial work vehicle.
Running your dishwasher and washing machine the evening before is a smart move. Homeowners will be without hot water for several hours during the swap.
Pro Tip: Clear up to 16 square feet of floor space if you are removing an old 50-gallon tank. This gives the crew plenty of room to maneuver the heavy tank out safely.
Step 1: Arrival and Setup
The installation team typically arrives between 8 AM and 9 AM to maximize the workday. Our standard procedure starts with placing protective drop cloths across all high-traffic floor areas. OSHA guidelines recommend a clean, organized workspace to prevent slip-and-fall hazards.
The lead technician will walk through the property with you to confirm the final plan. We then shut off the main gas valve and the water supply to the existing unit. Electric models require flipping the breaker off at the main electrical panel.
Initial Setup Steps
- Laying down floor protection.
- Confirming the layout plan.
- Shutting off the water supply.
- Disconnecting the gas or electric lines.
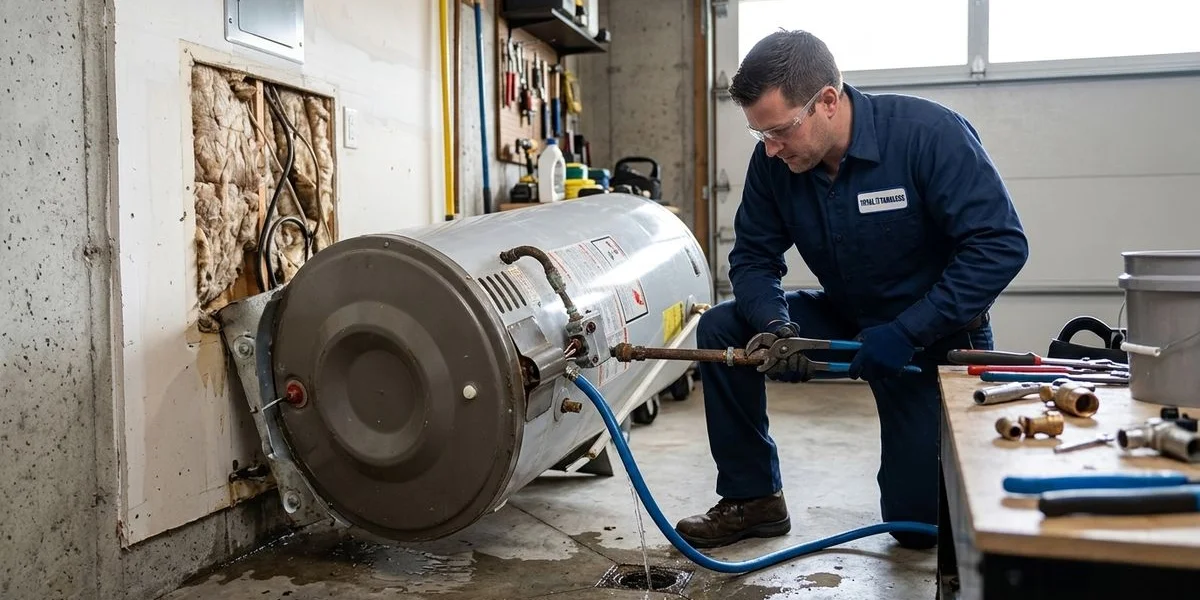
Step 2: Removing the Old Water Heater
The first physical task involves draining the old tank completely. Our plumbers connect a commercial-grade hose to the drain valve and route it outside. A full 50-gallon tank weighs around 570 pounds due to the retained water.
Emptying it drops the weight to roughly 150 pounds, making removal much safer. We disconnect the old gas line, water connections, and venting before carefully lifting the unit. The discarded hardware is hauled away to an approved recycling facility.
| Equipment Type | Average Weight (Full) | Average Weight (Empty) |
|---|---|---|
| Standard 50-Gallon Tank | 570 lbs | 150 lbs |
| Modern Tankless Unit | N/A | 50 - 80 lbs |
Step 3: Gas Line Work
An existing gas line often falls short of the higher BTU requirements. Our installers handle this upgrade as a core part of the conversion process. Standard storage heaters run on a half-inch pipe and use about 40,000 BTUs.
High-efficiency on-demand models often demand up to 199,900 BTUs to heat water instantly. We install a new three-quarter-inch line from the meter to ensure adequate fuel delivery. This modification requires strict adherence to the National Fuel Gas Code formulas for pressure drops.
Code Compliance and Safety
Local building authorities highly regulate this portion of the project. Our certified plumbers pull the required permits and schedule all necessary municipal inspections. Proper sizing prevents your furnace or stove from losing pressure when the hot water turns on.
You can rest easy knowing the system is safe and up to code. We double-check every connection point with electronic gas sniffers. Safety is the top priority during fuel line modifications.
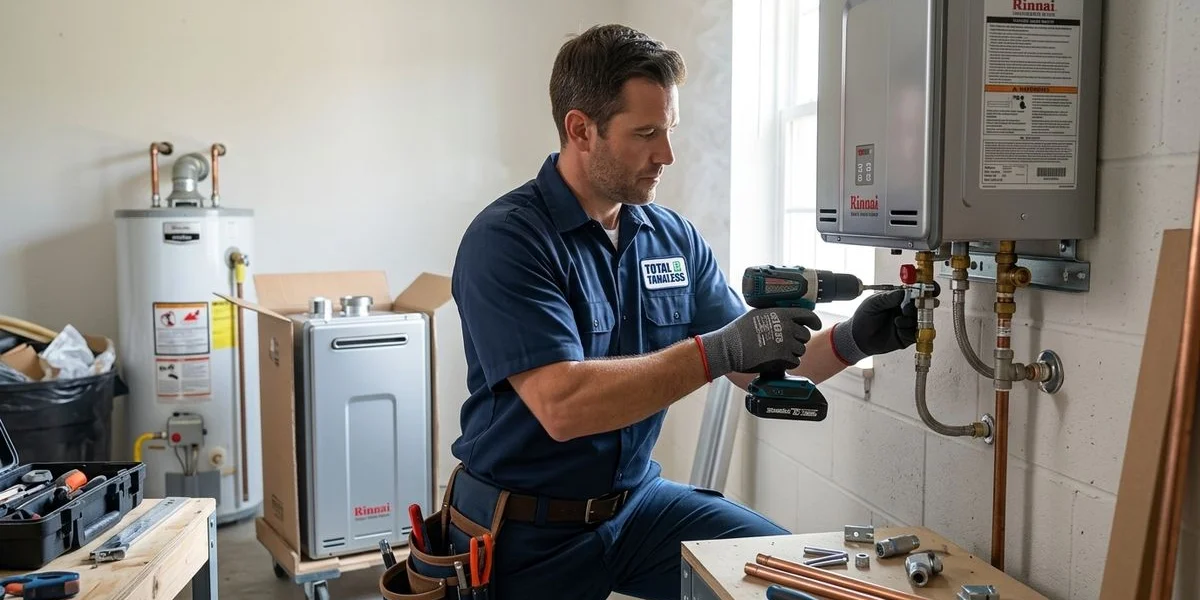
Step 4: Mounting the Unit
The crew mounts the new hardware on the wall once the old tank is gone. Our selected mounting location depends on proximity to the main water trunks and exterior walls. Units from top US brands like Rinnai and Navien weigh between 50 and 80 pounds.
Heavy-duty steel brackets must anchor directly into the structural wall studs. We ensure adequate clearance remains around the chassis for future servicing. A properly secured unit minimizes vibration and extends the life of the internal components.
Safety Standard: Proper wall anchoring is crucial. A fully operational wall unit contains water and internal components that require stable support to prevent pipe stress over time.
Step 5: Venting Installation
On-demand systems require dedicated venting that is completely different from traditional atmospheric chimneys. Our experts use sealed combustion designs with Schedule 40 PVC or CPVC piping. The United States requires these materials to meet UL 1738 safety standards for proper exhaust handling.
The installer cuts a precise hole in the exterior wall to route the pipe outside. We seal the penetration point with professional-grade, weatherproof silicone. Termination points must sit specific distances away from windows, doors, and public walkways.
Venting Clearances
- Distance from operable windows.
- Clearance from exterior doors.
- Height above ground level to avoid snow buildup.
- Proximity to neighboring property lines.
If your old setup used a B-vent chimney through the roof, it gets capped. Our team seals the old roof penetration to prevent drafts and rainwater leaks. Proper exhaust routing prevents carbon monoxide issues inside the building.
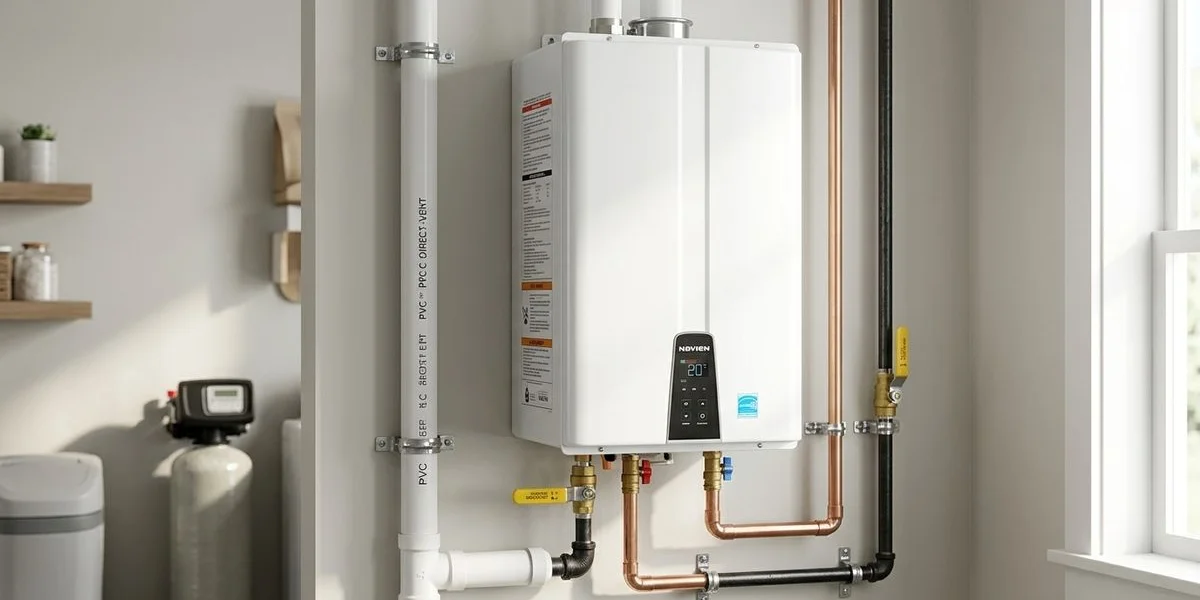
Step 6: Water Line Connections
Connecting the cold inlet and hot outlet requires precision plumbing skills. Our technicians adapt the existing copper or PEX pipes to fit the new chassis connections. US plumbing codes mandate the installation of isolation valves on both sides of the unit.
These valves make it easy to flush the heat exchanger during annual maintenance. We also install a sediment trap on the gas line to catch debris. An expansion tank is added if your local municipal water system requires a closed-loop setup.
Common Plumbing Upgrades:
- Hot and cold isolation valves.
- Sediment traps on the fuel line.
- Thermal expansion tanks.
- Pressure relief valves rated for 150 PSI.
Step 7: Testing and Commissioning
Pressurizing the lines is the first step of the testing phase. Our crew checks every single newly soldered or threaded joint for microscopic leaks. A specialized leak detection solution confirms the gas connections are perfectly sealed.
The control board is then powered on and configured for residential use. We set the default temperature to 120 degrees Fahrenheit based on US Consumer Product Safety Commission recommendations. Running multiple fixtures simultaneously allows the technician to check the maximum flow rate, which often hits 10 to 11 gallons per minute.
Commissioning Checklist
- Verifying water line pressure.
- Testing gas joints with leak detection fluid.
- Setting the thermostat to 120 degrees Fahrenheit.
- Confirming ignition and shutdown sequences.
The system must fire correctly the second flow is detected. Our final checks verify that the burners shut down cleanly the moment the tap closes. Consistent performance across these tests guarantees a successful and safe upgrade.
Step 8: Cleanup and Walkthrough
A professional crew leaves your utility room looking better than before. Our final step involves sweeping the floors and hauling away all packaging debris. The old metal tank goes straight to a local metal recycling center.
We then provide a comprehensive walkthrough of your new control panel. The technician shows you how to adjust the digital thermostat and read the basic error codes.
Important Walkthrough Topics
- Temperature Controls: How to safely adjust the digital display.
- Isolation Valves: Locating the shutoff points for future maintenance.
- Error Codes: Understanding the diagnostic screen.
- Warranty Details: Registering the typical 15-year heat exchanger warranty.
How Long Does It Take?
Swapping an existing wall-mounted unit is a relatively fast process. Our records show a straightforward replacement takes about three to four hours. Upgrading from a floor tank to a wall-mounted system takes five to eight hours.
This longer timeline accounts for the complex gas pipe upgrades and new exterior venting. We finish the vast majority of these projects in a single workday. You will have endless hot water flowing by the time the service truck leaves your driveway.
| Installation Type | Average Time Required | Complexity Level |
|---|---|---|
| Tankless to Tankless Swap | 3 - 4 Hours | Low |
| Tank to Tankless Conversion | 5 - 8 Hours | High |
Tips for a Smooth Installation Day
Having an adult present at the house keeps the workflow moving without delays. Our technicians might have quick questions about your preferred mounting height or exterior vent placement. Pets should stay secured in another room away from the open exterior doors.
We want you to have realistic expectations about the construction noise. Cutting lumber, drilling through brick, and soldering pipes create a loud environment for several hours. Do not hesitate to ask the lead plumber questions as they work.
Preparation Reminders
- Have an adult present all day.
- Keep pets in a secure, quiet room.
- Prepare for moderate construction noise.
- Ask the lead plumber any questions you have.
Our goal is to ensure you feel comfortable with the new hardware. A transparent contractor is always happy to explain their methods. The US Department of Energy states these appliances can last 20 years or more with basic care.
We stand by that long-term reliability with quality workmanship. Taking a single day for proper setup is a very small price for decades of performance. Contact us today to schedule your home assessment, and let us show you exactly What to Expect During a Tankless Water Heater Installation.
Plan your budget ahead with our free tankless cost estimator to get a personalized price range for your specific home setup.
Licensed master plumber and lead technical advisor at Total Tankless with 25+ years of tankless water heater expertise.
Need professional help with your tankless water heater?
Learn About Our Tankless Installation Service